Adding Custom Fields to your Program:
Custom Fields are applied to the Client or Organization, then mapped to Users in your "People" tab. Examples of Custom Fields include: leadership level, location, department, tenure, or other organizational or demographic characteristics.
Once you've set up Custom Fields, and assigned them to Users, you can use these to filter most reports and organize your data for deeper insights using our Adaptable Reports or your own custom reports.
Create Custom Fields for your Client:
- Navigate to your Client or Organization Dashboard and click on the "Custom Fields" tab.
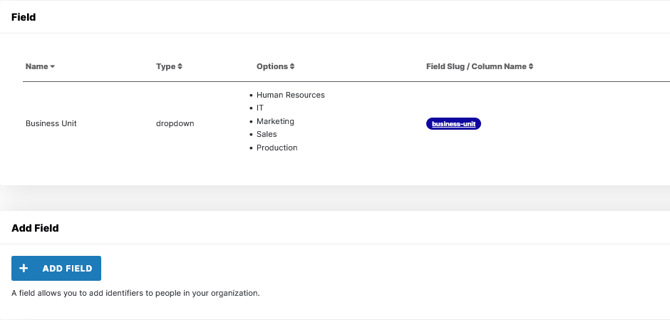
- Click "Add Field"

- Name the Field (e.g. Business Unit, Division, Department, Level etc.)
- Select the Field Type:
- Drop down - when adding to a user record, you select from a pre-set list of options or use exact text when doing a bulk upload. You'll need to add the specific options (available values) which will appear in the Field drop down list in the User profile. This type is ideal when you have a limited number of options, and ensures consistency in reports.
- Text- this allows you to free-type or upload any data related to the field. This type is more flexible, and useful when you have many options, but may result in duplicates when reporting.
- Once you've added your Field Name, Type, and Values, click "Add" to create the Custom Field. You'll see the details above for each field you add.
Once your Custom Field is created, it will be visible in User profiles, and as a filter for embedded platform reports. You can add, edit or delete Custom Fields anytime.
Assigning Custom Fields to Participants:
You can assign Custom Fields a couple of different ways depending on the size of your program and the timing.
Option A: Bulk Upload
-
- Path A - Before the Session:
- Following the instructions within How to Bulk Upload Participants including the "Custom Field slugs" now available from the previous step.
- Import the User List as a CSV.
- Path B - After the Session
- On the People tab for the client, Click Export Users.
- Use the Exported file to create the User Import List, adding the data to appropriate. columns
- Import the User List as a CSV.
- Path A - Before the Session:
-
- Once participants have made commitments, navigate to the People tab
- Click the Pencil under Options, to see the Participant settings.
- Scroll to the bottom of the form, and enter the Custom Field information.
- Click Save, and repeat with next Participant.
Using Custom Fields
Once you've set up Custom Fields and assigned these to Users you'll be able to use them to see dashboard visualizations for the selected field value (i.e for a specific department or region).
Grouping Data by Custom Fields in Dashboard Widgets
Steps:
- Navigate to the widget you would like to group by a Custom Field
- Hover over the widget and click the edit button in the upper right corner

- If you're changing the data in your widget, you should edit the Title of your widget as well. Then, click "Update/Next"

- Click the edit button in the upper right corner

- Set the Custom Field group by
- In the Group By field, choose Custom Field
- Choose which Custom Field you want to show
- Click Update
- Click Done
