How do I Create or Edit a Module?
We'll walk you through detailed steps and some best practices for creating and editing a Habit Builder or Leader-Led Conversations Module
See also: How do I Create a Program? and Actionable Program Terminology
Article Quick Links:
- Create a New Module
- Access your Program Modules
- Creating a Module by Copying from Existing Module
- Editing Modules that have not been Activated
- Activating Your Module
- Editing Modules that have been Activated
- Module Components
Create a New Module
There are two ways to create a completely new Module.
- You can create Modules by defining the number of Modules in your Program as you work through the Program Creation Wizard.
- Alternatively, you can add Modules to a current Program from your Program Overview Screen. Simply click "Add Module."
Access your Program Modules
If you want to add or edit specific Modules in a Program, you can access everything from your Program Overview screen.
- Click "Programs" in your left sidebar, or navigate to a client and select the "Programs" tab in the Client Screen.
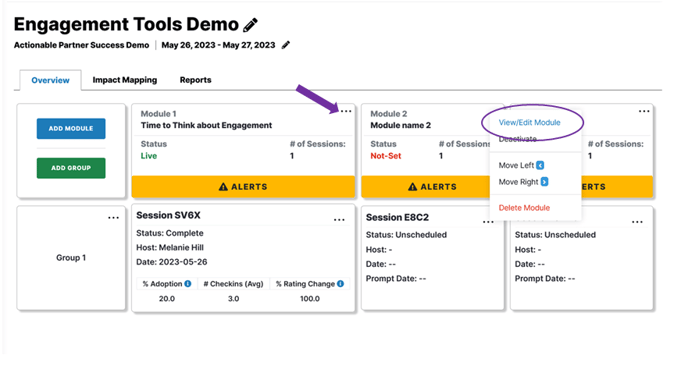
- Go to an existing Module card. Click the 3 dots in the top corner; and select "View/Edit Module" OR you can click the Module title to open up the Module editor.
- If you need to add a new Module, click "Add Module" first. In the Program Overview screen:
- Change the order your new Module (or any Module) appears in your Program by clicking the "Move Left" or "Move Right" arrows in the drop down.
Creating a Module by Copying from Existing Module
Copying existing content makes the design process easier. By copying a Module you import all of your content including your Broadcast Schedule, Commitments, and Questions.
- Locate the Module that you would like to edit or set-up.
- Click the three dots on the top right-hand corner of the Module box and select "View/Edit Module." Or click on the Module title.
- Select Copy from Existing Module.
- Using the Search Tool, type in key words to identify the Program or Module you would like to copy.
- Select the Module and click next
- Review and edit the Module as necessary for your new client, program, or continuation.

Editing Modules that have not been Activated
Once you've created the overall structure of your Program you'll need to create the content that your participants will experience. You do this in a Module. You'll find your Modules on the top row of the Program Overview Tab.
- Locate the Module that you would like to edit.
- Click the three dots on the top right-hand corner of the Module box and select "View/Edit Module." OR click on the Module title.
- Select whether you'd like to Copy from Existing Module or Create New Module.
- If Copying from an Existing Module you can learn more here.
- Edit or populate the Module details following the Module Components list below.
Activate your Module
Once you've populated all the components of your Module, make sure you complete these final steps to make it available for your participants!
- Click "Activate" at the bottom of your Module Screen to make it live.
- Go back to your Program Overview. (There's a link to this underneath your Module Title).
- In the Program Overview Tab, review the Groups that are assigned Sessions in this Module. If not all groups are completing this Module, you can delete their Session by clicking on the option icon (3 dots) on the Session Card and selecting "Delete Session."
Editing Modules that have already been Activated
If you want to edit a Module that has already been Activated and/or distributed to a group, you are limited in what you can edit. You cannot edit Commitments. However, you can edit Prep Materials, Host Materials, and Questions. Changes to these areas will appear on any Sessions that have not yet run, and in any subsequent Sessions that you add to the Program.
- Locate the Module that you would like to edit.
- Click the three dots on the top right-hand corner of the Module card and select "View/Edit Module." or click the Module title.
- Edit and/or populate the Module details as per the list above.
- Changes will automatically save.
Module Components
Logistics Tab
The Logistics Tab contains scheduling and identification details for your Module.
- Module Name: You can edit the Module Name by clicking the Edit Icon next to the Module.
- Commitment Duration: The number of days you would like participants to work on their Commitment. The Commitment Duration is the same for each participant, no matter when they begin their commitment. In other words, if your Commitment Duration is 30 days, participants will all get 30 days regardless of what date they start their Commitment.
- Session Duration: For Leader Led Conversations, this indicates the recommended time for the Conversation, for scheduling purposes.
- Leader-Led Conversation: Depending on your Subscription Level, you might be able to select if this Module will be a Leader-Led Conversation Module or a Habit Builder Module. If you select Leader-Led Conversation Module, you'll have additional options to support Leaders with scheduling their sessions. (See How Do I Set Up Leader Led Conversation Modules for details.) For Habit Builder Modules, you will schedule the Sessions.
- Host Visibility: You can define here whether or not the Session Host or Facilitator (who isn't you) can view Commitment details and Reports. If you'd like Facilitators or Coaches, or Leaders to see participant activity and make comments, switch it ON. In some cases, if a Host isn't a Coach, or direct leader, you may not want them to view Commitments and Reports, and you can leave if OFF.
- Session Summary: The Session Summary Table on the Logistics Tab contains high-level details about each Group and their interaction with the Module. Note that you can generate QR Codes for each session, delete or add a Session, or make bulk changes right from this table.

Prep Materials Tab
(Optional for Habit Builder Modules)
If you want to send some materials out prior to your session, you can populate those here. Note that what you fill in on this tab will create a separate page that you can distribute prior to your in-person session. It will not share the remainder of your Habit Builder. Prep Materials are needed in Leader-led Conversation Modules to prepare groups for their Conversation.
Participants experience the Prep Materials page in three phases:
Phase 1: Welcome Message
Phase 2: Create their Actionable Account and/or Sign In to their Actionable Account
Phase 3: Session Prep Materials, Downloads, and Questions
- Welcome Page: This page is publicly available and serves as the landing page for your Sessions. Put guiding text here, such as "Welcome to XXXX Session! Please create your Habit Builder account below. If you have used Habit Builder before, please sign in with your existing login details."
- Session Prep Page: This page occurs after a participant creates and/or signs in to their Actionable account. Here you can provide any preamble, pre-reading, or pre-session learning materials. Session Prep Pages can include links to outside sources, embedded video content, and an invitation to reach out to you if they have any questions.
- Downloadable Materials: If you have any downloadable materials for your participants, you can upload them here. The documents can be either .pdf or.docx format.
- Questions: This is an excellent time to prompt some pre-session reflection and/or to gather some data about your participants' current experience. Note: you'll create your questions on the Questions Tab.
Once you have filled out content in the Prep Materials Tab, a URL and QR Code will be available in the QR Code Window in your Logistics tab, or when you click on the options icon for that Session in the Program Screen. You can share the URL or QR Code with your participants whenever you'd like them to have access.

Host Materials Tab
(Only available with Plans that include Leader-Led Conversations Scheduling feature. Required for Leader-Led Conversations Modules)
If you're creating a Leader-Led Conversations Module, you'll provide Hosts everything they need to run a Conversation Session with their Group, including general instructions and Leader Notes. Once you populate the Host Materials tab, and Activate the Module, Hosts will be able to login and access everything from their "Session Materials" Tab when they login from their scheduling prompt notification, or anytime they login and access their assigned Session.
If you're creating a Habit Builder Module, if available, you can load materials into this section for your own access, or for other Hosts (i.e Facilitators or Coaches) that support your work. Once you populate the Host Materials tab and Activate your Module, Hosts will be able to access everything form the "Session Materials" Tab when they login.
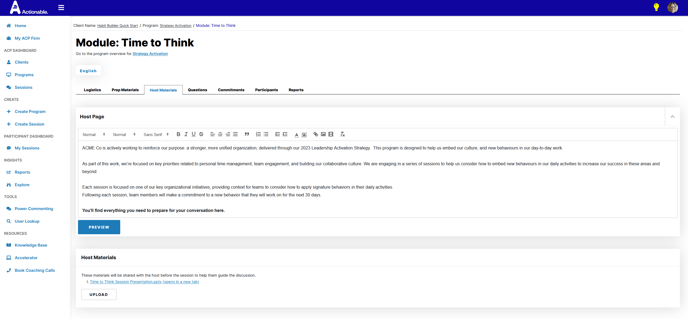
- Insert any messaging you'd like to include to your Host in the Host Page box.
- Upload your Host Materials using the Upload button.
Please note that Host Materials are required for Leader-Led Conversations Modules, and Optional for Habit Builder Modules.

Questions Tab
In the Questions Tab, you define the questions that Participants will answer in every step of their Habit Builder Journey. We break down the different questions below. Check out the Hive for a video overview and a bank of questions that you can use.
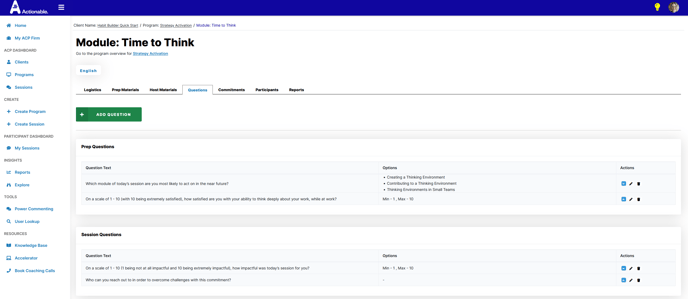
Prep Questions are asked if and when Prep Materials are shared. Typically, this is before a Participant is in the Session with you. You can get great insight about your Participants' existing perspectives by utilizing Prep Questions.
Session Questions are asked before your participants make their Commitment. This is a great time to gather satisfaction feedback or to gather early-stage data from your Participants.
Commitment Questions are asked after your participants make their Commitment. This is an opportunity to help participants establish a sense of buy-in and personal ownership about this commitment. Note that this section also includes the Reward Question: What will be the benefit of establishing this new habit? The Reward Question is included in every Session and cannot be edited.
Reflection Questions are asked at the end of the Commitment process. For example, if your Commitment is set for 30 days, participants will be sent the invitation to complete their Reflection Questions on the 31st day. This is a good opportunity to gather more data about the impact your program has had. And, by reflecting on their progress thus far, Participants will be more likely to successfully continue the new behavior outside of the context of the Habit Builder.
Add a Question
- Click "Add Question."
- Insert the text of the Question. If your Question will be a Scale Question, it's a good idea to include a Scale Indicator that denotes what the top and bottom values of your scale mean.
- Select the Question Type. You can choose from Text, Multiple Choice, Scale, or All that Apply.
- Multiple Choice: Insert the potential answers.
- Scale: Indicate the value range.
- All that Apply: Insert the potential answers.
- Select where you would like the Question to appear to your Participants: Prep, Session, Commitment, or Reflection (as above). You can select more than one place for your Question to appear. This is a good way to see a difference in response from e.g. the Prep Materials phase and the Reflection Questions phase.
- You can use the Required Toggle to indicate whether or nor participants are required to answer the Question.
- Click "Save."

Commitments Tab
Use this tab to set up the Commitments that Participants can pre-select. Participants will always be able to modify the commitment to better-suit their own context. If you choose to not include Commitments, participants will be instructed to create their own. We recommend providing Commitments for Participants to select and modify. If you choose not to include those, we then recommend that you spend time guiding Participants to an effective Commitment.
Commitments are structured by Theme, Trigger, Current Habit, and New Habit. For more context and best practices around each of these pieces, please see this Accelerator Video.
- Determine which pieces of Commitment Structure are required by using the toggles under "Commitment Template."
- Select whether or not users will be allowed to make Custom Commitments. If you want them to have this ability, leave the toggle set to its default. If you want to turn that ability off, switch the toggle to off.
- Click "Add Commitment."
- You'll see a preview box and a set of text fields. Insert your Commitment Elements into the text fields.
- If you'd like to delete your commitment, click "Delete."
- If you'd like to add another Commitment, click "Add Commitment."
If you need support creating Commitments, you can use the Commitment Generator, more information on how to use this feature can be found here.

Broadcast Tab
The Broadcast Scheduling feature makes it easy to schedule and personalize comments to go out to your participants based on their habit building stage or experience. Learn more about Broadcast Scheduling here!
Below you will find the quick steps to schedule a Broadcast Comment:
- Identify Sender and Recipients
- Set Comment Delivery Trigger:
- When will the message be delivered?
- Now - will send out the comment once you click "Send" and will go to the selected group of participants within approximately 5 minutes.
- Timeline - will allow you to schedule a comment to go out based # of Days After the trigger you select.
- Select a Trigger option
- Set the delay (Days After) for the comment to be delivered.
- When will the message be delivered?
- Add Comment Text
- Using personalization tokens or emojis, customize the message you want to send to the participants depending on the stage or experience.
- Schedule or Send the Comment
Adding Another Language
The Actionable Platform allows you to run your Module in English, French, and Spanish. When they create their Commitment, Participants will be prompted to select their preferred Language out of the Languages that you have selected.
- Click "Add Language."
- Select the Language that you wish to add.
- After completing the Logistics, Prep Materials, Host Materials, Questions, and Commitments tabs in English, toggle to your additional language by clicking on the Language Name.
- Go back through your Logistics, Prep Materials, Host Materials, Questions, and Commitments tabs and add in translations for all fields.
Editing Modules that have already been Activated
If you want to edit a Module that has already been Activated and/or distributed to a group, you are limited in what you can edit. You cannot edit Commitments. However, you can edit Prep Materials, Host Materials, and Questions. Changes to these areas will appear on any Sessions that have not yet run, and in any subsequent Sessions that you add to the Program.
- Locate the Module that you would like to edit.
- Click the three dots on the top right-hand corner of the Module card and select "View/Edit Module." or click the Module title.
- Edit and/or populate the Module details as per the list above.
- Changes will automatically save.