How do I Manage My Program?
Once you've created your Actionable Program, you'll have visibility and access to everything you need from your Program Screen.
Article Quick Links:
- Program Overview Screen
- Distribute Your Session Links, ID, QR Codes
- Review Session Status and Key Metrics
- Alerts
- Add Groups and Modules
- View/Edit Module Details
- Remove a Program
Program Overview Screen
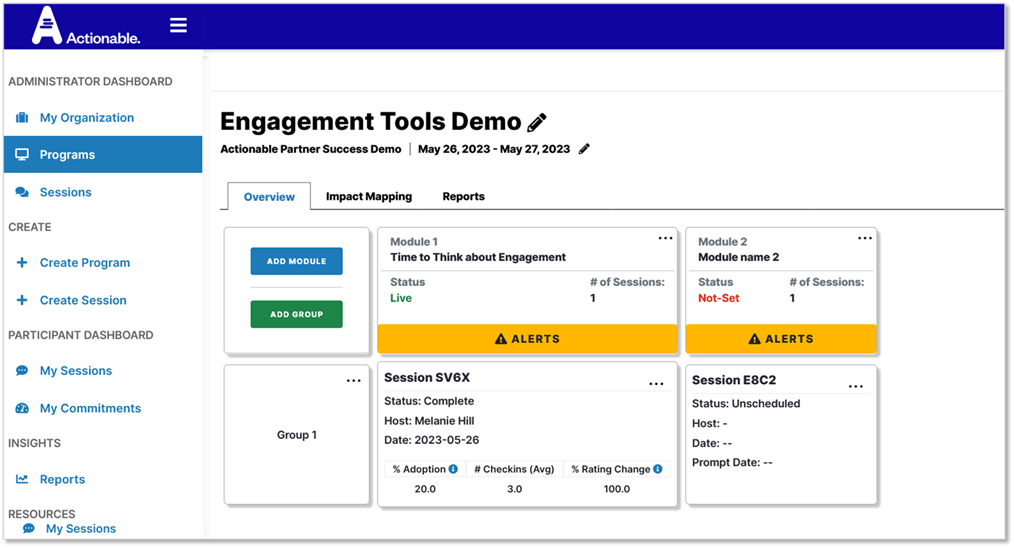
The Program Overview Screen gives you full control, with visibility and access to everything you need to edit, launch, and monitor your program. From this screen you can:
- Add Groups, Modules, and Sessions
- Access Session links and codes
- Make bulk changes to Groups and Sessions
- See Alerts on Module and Session status
- View key metrics
- View/edit any Group, Session, and Module details
Distribute Your Session Links, ID, QR Codes
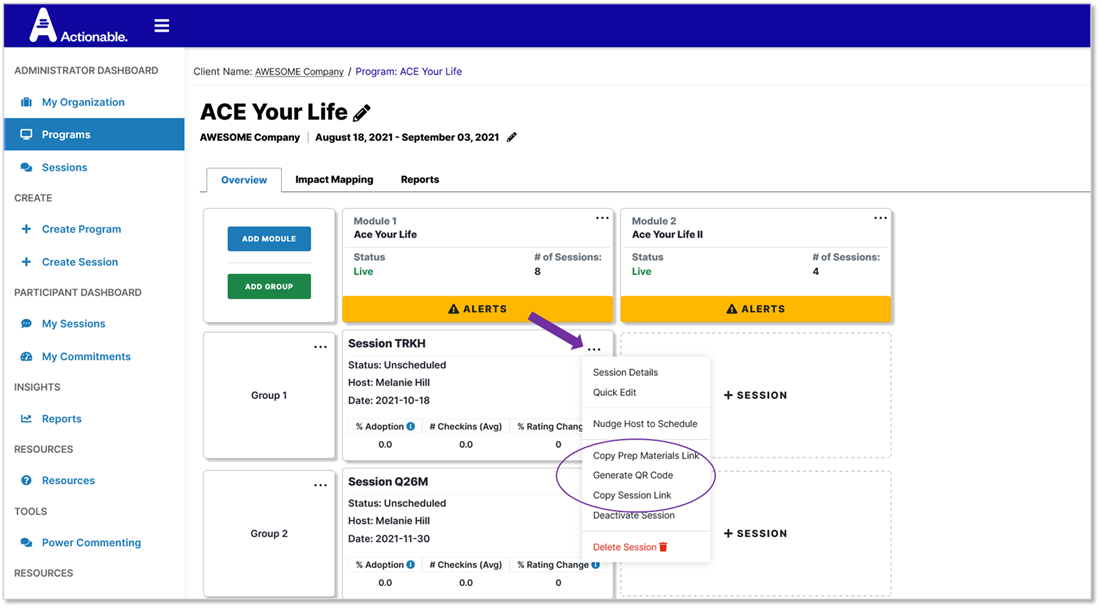
Need a quick link or code for your Session? You'll find it with a single click.
- In the Session card, click the three dots in the top right of the the card.
- In the menu select the option you need: Prep Materials, Session URL, or QR Codes
- Your Session ID is located directly in the Session card as well.
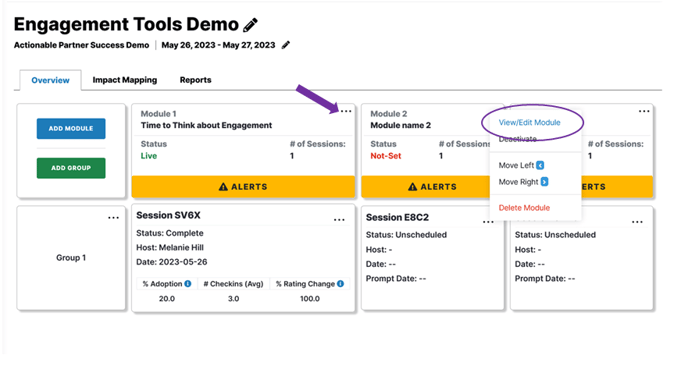
You can also click the three dots on you Module card, select "View/Edit Module" and view the Logistics Screen for the full list of your Sessions including Session ID/QR Codes/Links.
Review Session Status and Key Metrics
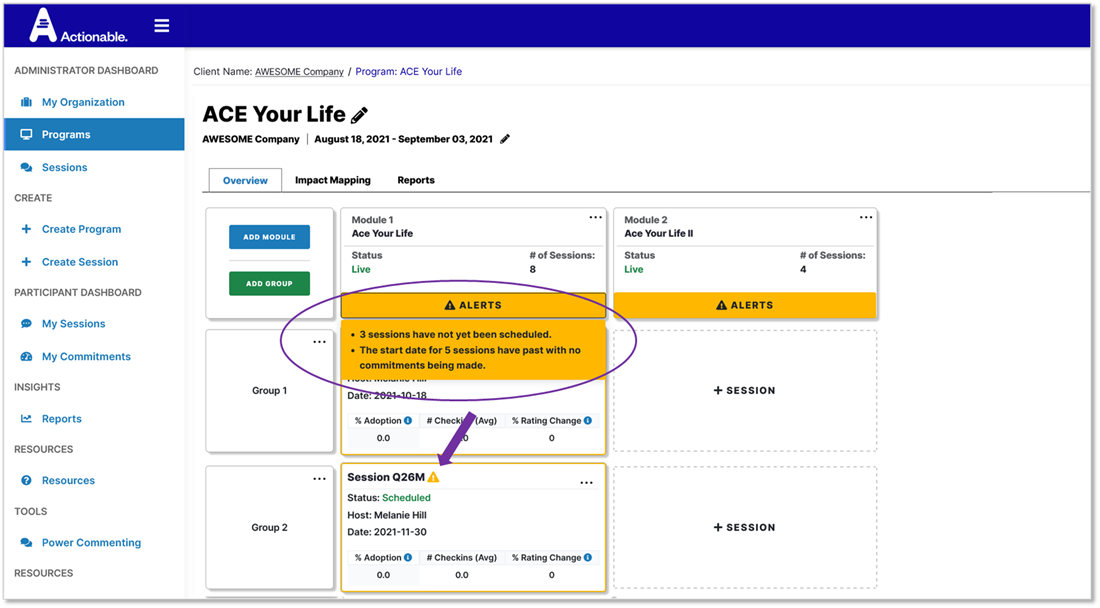
Once your Module is set up, you'll see key information right from your Program Screen including:
- Module Status - you'll know which Modules are Live, Draft, or Not Set
- Session Status - you'll see which sessions have been Scheduled, Active, or Complete.
- Key Session metrics: Adoption (%), Check-ins (#), and Rating Change (%)
Alerts
Quickly identify issues or missing data across all your Sessions. Click the "Alerts" bar and you'll see a summary of alerts and identifies Sessions will be highlighted. Click the bar again to clear the list.
Add Groups and Modules
You can keep building your program as you go, adding new Groups or Modules (content) as you need.
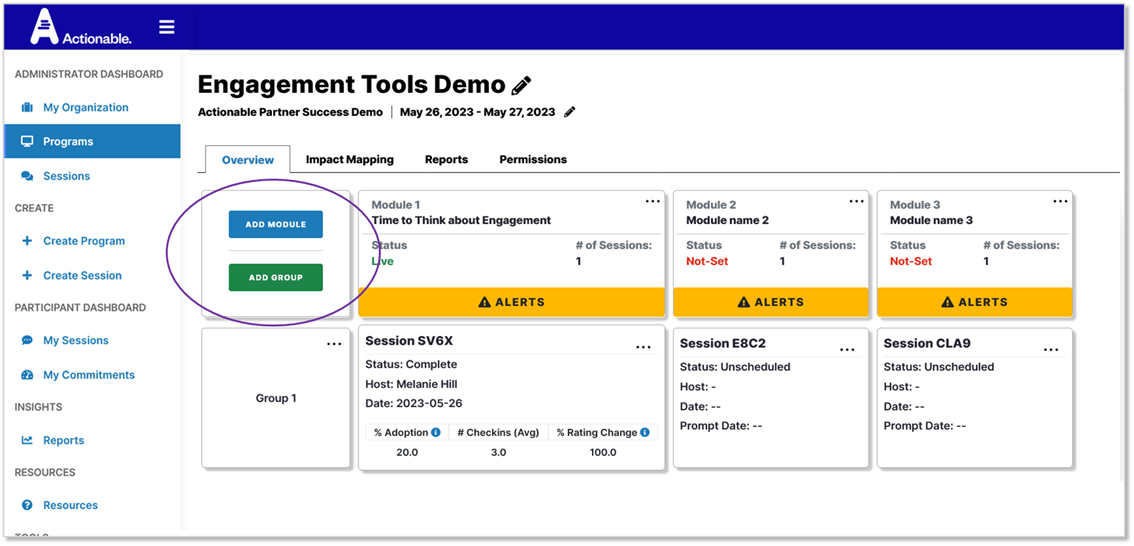
To Add a Module:
- Click on "Add Module" - it will be added to the end of the row
- Click the 3 dots in the Module card to change the order (Move Right or Left)
- Select "View / Edit" to set up your Module Content. (See View/Edit Module Details)
To Add a Group:
- Click on "Add Group"
- Add required details (Group Name, Host, Participants etc) in the pop up window
- Click "Add Group"- you will see the Group at the end of the column
When you add a new Group to a Program with existing Modules, Sessions will be automatically assigned to that group across all Modules. You can delete any sessions you don't need.
View/Edit Module Details
Dive deeper into your program content, Session scheduling, and Participant data. You can access all of your Habit Builder details as well as Session scheduling, Participant data and reports.
- Click the three dots in the top corner of your Module care
- Select "View/Edit Module Details"
- Select the Content Tab you'd like to edit - see How do I Create or Edit a Module
View or Schedule Additional Sessions
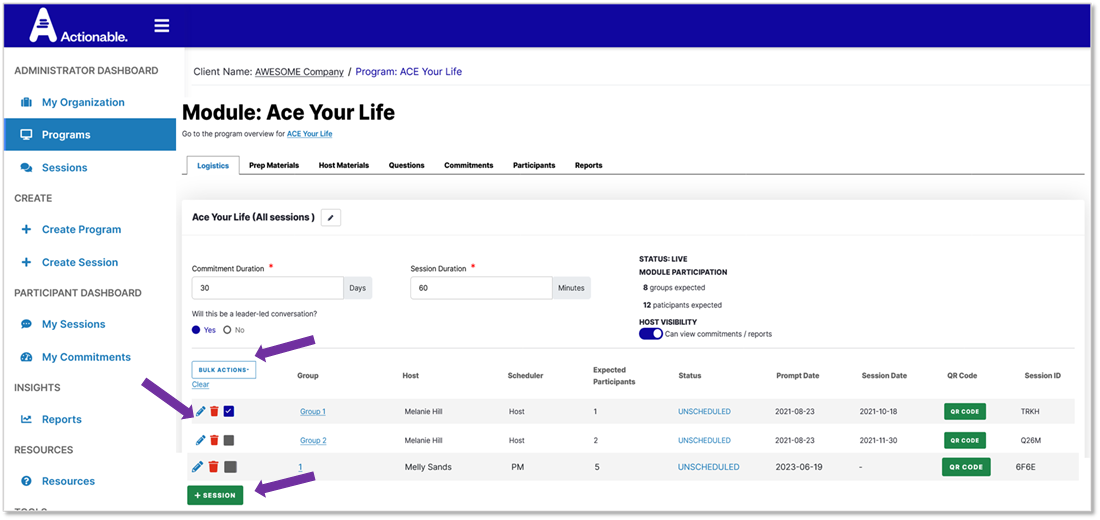
From the Logistics tab, you'll see the details for all Groups and Sessions assigned to your Module, including Status, Host details, Session IDs/Codes.
- Click on the Group link to view Session details
- Click on the pencil icon to edit Session details including Host, date, expected participants right from the Module screen.
Bulk Actions
Make changes to one session or across multiple sessions
- Click the box for the Sessions you'd like to make the same edit, or bulk action.
- Once a box is checked, the "Bulk Actions" button will be active above.
- Click on the button to access Bulk Action menu, then select action. This will be applied to all Sessions you've checked.
If you want to edit Module Content, see How do I Create and Edit My Module
Participant Engagement Tools
You can access tools to support your participants in various locations, either directly from your Program Screen, or as you dive into your Module data.
Here you can see more about what a participant will receive when a Host comments on their Commitment.
Broadcast Scheduling
The Broadcast Scheduling feature makes it easy to schedule and personalize comments to go out to your participants based on their habit building stage or experience. Learn more about Broadcast Scheduling here!
You can set up Broadcast Scheduling as you create your Program and set up your Modules, or anytime throughout the program. You'll find the Broadcast Scheduling Tab in your Module Screen.
Below you will find an overview of how to access Broadcast Scheduling.
From the Program Overview Tab:
- Locate the Module that you would like to edit.
- Click the three dots on the top right-hand corner of the Module box
- Click "View/Edit Module."
- From the Module screen select the "Broadcast" Tab.
- Or click "Broadcast Scheduling" to be taken directly.
- Click "View/Edit Module."

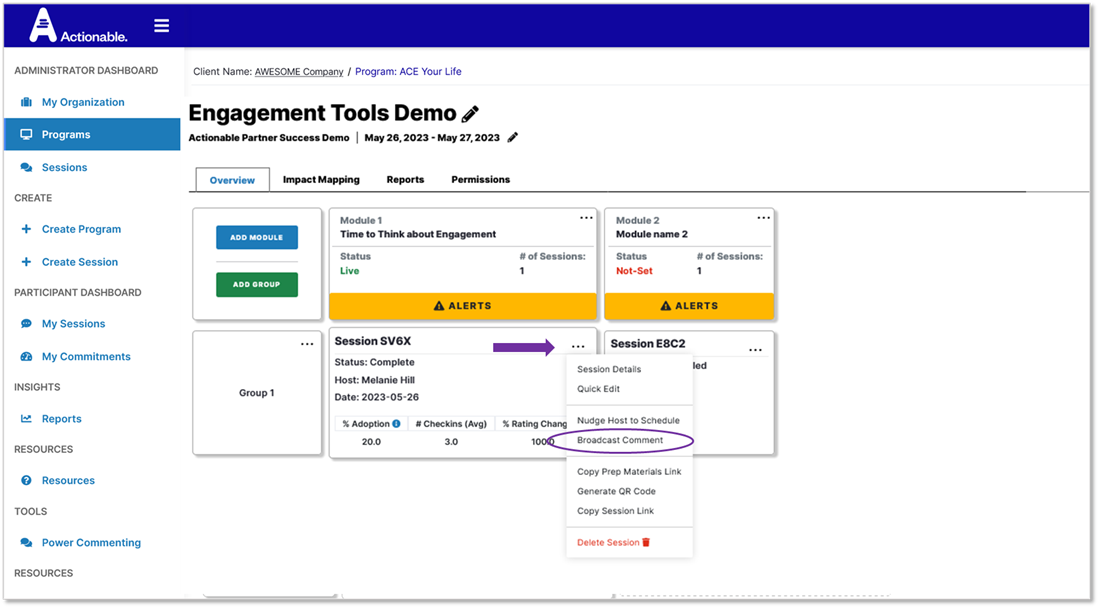
Alternate Option: From the Program Overview Tab, go to a specific session, click the options (three dots) and click on "Broadcast Comment" option. You will be redirected to the Module Broadcast Tab.
Resend Reflection Questions
Send additional reminders to Participants to complete Reflection Questions if they haven't had a chance to complete them.
From Your Module Screen:
- Navigate to your Participant Tab
- Navigate to the Group Summary or click on the Group Session ID to navigate to a specific Group.
- Click "Resend Reflections."
- Click "Yes."
- Only Participants who have not completed their Reflection Questions will be nudged via their preferred contact method.

Sending Individual Comments
From the Participant Tab
1. Click on a Group's Session ID to see a list of Participants in that Session.
2. Click on each Participants' name to see more detailed information about their Commitment and to leave individualized comments on their Commitment.
To view multiple Commitments across all your programs and streamline Individual Commenting use our Power Commenting Feature!
Access and View Reports
You can access reports from both your Program Screen (for Program level reports) or your Module Screen (for reports specific to that Module).
- Navigate to the "Reports" Tab in either your Program Screen or Module Screen.
- Select the Report that you would like to view.
- Filter the report fields as needed.
- Click "Generate Report."
Download or Schedule Report Delivery (if available in your plan)
- Click the three vertical dots in the top-right corner of the report.
- Click "Download" or "Schedule Delivery."
- Customize the way in which you would like to Download or Deliver your Report.
- Click "Save."
You can also download specific visualization tiles (in .csv, .xls, or .png formats) by clicking the dots in the top corners of any data tile.
For more reports, see Reports Landing Page.
Remove a Program
If you need or want to remove a program you have created, this can be done with a little support. Please follow the directions below to remove a Program.
- Open the program you would like to delete and ensure that you want to delete it
- Delete all Groups from the program
- Right click the three dots in the top corner of the Group tile
- Click "Delete"
- Do this for all Groups
- Delete all Modules from the Program
- Right click the three dots in the top corner of the Module tile
- Click "Delete"
- Do this for all Modules
- Email help@actionable.co with the URL for the program you would like to delete and confirmation you would like the program removed.
- Stand by for a confirmation email!